Cross platform 256bit AES encryption / decryption

Recently I was writing an app for iOS and Android. Both the apps connect to webservices written in C#. One of the challenges that I faced was to securely encrypt and decrypt the sensitive data.

The encryption which I chose was – AES 256. However getting the cross platform encryption / decryption to work was a big challenge. Those of you who have worked on cross platform encryption / decryption must already be knowing about this. I also searched on internet but couldn’t find example of secure implementation of cross platform 256bit AES encryption / decryption. So I ended up writing my own library which I would like to share in this post.

Now what makes an implementation of AES 256 secure ? There are important things to consider here. First, the key used for encryption should be hashed. Some of the code snippets which I have seen on internet use plain text as key, which is a security flaw. Second, the initialization vector or IV should always be random. This is very important. Most of the implementations which I have seen on internet either do not use an IV or use hardcoded IV. To generate Random IV you’ll need a truly random number and getting a truly random number on mobile device (using sensor data) is an interesting and  separate topic of discussion in itself ! 

What happens if you don’t use random IV ? Read here and here.

Source code for the project is available here – https://github.com/Pakhee/Cross-platform-AES-encryption

This project contains the implementation of 256 bit AES encryption which works on all the platforms (C#, iOS, Android). One of the key objective is to make AES work on all the platforms with simple implementation.

Platforms Supported:

  1. iOS

  2. Android

  3. Windows (C#).

Features:

  1. Cross platform support. Encryption-Decryption works across C#, iOS and Android.

  2. Support for Random IV (initialization vector) for encryption and decryption. Randomization is crucial for encryption schemes to achieve semantic security, a property whereby repeated usage of the scheme under the same key does not allow an attacker to infer relationships between segments of the encrypted message.

  3. Support for SHA-256 for hashing the key. Never use plain text as encryption key. Always hash the plain text key and then use for encryption. AES permits the use of 256-bit keys. Breaking a symmetric 256-bit key by brute force requires 2^128 times more computational power than a 128-bit key. A device that could check a billion billion (10^18) AES keys per second would in theory require about 3×10^51 years to exhaust the 256-bit key space.

How to encrypt a string:

See code samples for more details. You’ll have to perform following steps:

  1. Generate Ramdom IV using the provided randomIV generator function.
  2. Select a secret key and hash it using the provided SHA-256 hash function.
  3. Encrypt your string using the hashed key and random IV.

How to decrypt a string:

See code samples for more details. You’ll have to perform following steps:

  1. Get the encrypted text and the randomIV used for encryption
  2. Decrypt the strying using the provided decrypt function !

Hope you’ll find this useful !

Posted in Uncategorized | Tagged , , , , , , , | 8 Comments

Consuming RTC (Rational Team Concert) OSLC APIs using C#: Post 1- Authentication

This is part-1 of the article series “Consuming RTC (Rational Team Concert) OSLC APIs using C#”.  I have written these articles because I couldn’t find enough resources on the Internet on this topic. I’ll be wiring multiple articles related to performing following actions using OSLC :

  1. RTC Form based authentication
  2. Get a WorkItem
  3. Create a new WorkItem
  4. Modify an existing WorkItem
  5. Query WorkItems

You’ll be able to understand this article better if you know about RTC OSLC APIs. There is an excellent article on jazz.net which you can read here – . This article provides a summary of the OSLC CM Rest APIs, along with shell script examples based on curl that illustrate the concepts in more detail. I am also assuming that you  have basic understanding of HttpWebRequest, HttpWebResponse, WebClient classes under System.Net namespace.

Scope of this article is limited to authentication for RTC repository. The two common authentication methods for an RTC repository are Basic Authentication and Form based Authentication. I have implemented Form based authentication for connecting to RTC Server. You can use either use WebClient or HttpWebRequest/HttpWebResponse. HttpWebRequest exposes lot more stuff as compared to WebClient and gives you granular control on the cookies. I have used both WebClient and HttpWebRequest.

Form based authentication is a three step process:

1. Client requests (GET) for protected RTC repository resource (like WorkItems).
2. If the client is unauthenticated, RTC Server redirects the client to the login page. Client has to programmatically authenticate by providing username and password (POST).
3. Client is redirected to the protected RTC repository resource which was requested in step 1. For all subsequent requests client is redirected directly to the resource.

In contrast to form based authentication, basic authentication is one step process where username and password is included in GET/POST request for a protected resource.

In Appendix-A of above mentioned article, you’ll find code snippet for form based RTC authentication using CURL. Lets take a look at the code given in the article:

COOKIES=./cookies.txt

USER=username
PASSWORD=password
HOST="https://localhost:9443/jazz"

curl -k -c $COOKIES "$HOST/authenticated/identity"

curl -k -L -b $COOKIES -c $COOKIES -d j_username=$USER -d j_password=$PASSWORD "$HOST/authenticated/j_security_check"

# If this line returns the JSON representation of work item 1, authentication was successful
#curl -k -b $COOKIES "$HOST/oslc/workitems/1.json"

In code above we are trying to access Workitem –1 using shell scripting through curl. First two commands take care of the authentication and all the cookies are written to $COOKIES variable. This is required only once per session. For all subsequent requests $COOKIES is used. This is shown in the third command above.

Now lets take a look at C# authentication code using

1. WebClient class:

public class WebClientExtension : WebClient
    {
        //cookie container
        private CookieContainer _ckContainer = new CookieContainer();

        //request server 
        protected override WebRequest GetWebRequest(Uri _url)
        {
            WebRequest _request = base.GetWebRequest(_url);
            if (_request is HttpWebRequest)
            {
                (_request as HttpWebRequest).CookieContainer = _ckContainer;
            }
            return _request;
        }
    }
   class Program
    {
        static void Main()
        {
            //create object of WebClientExtension class
            using (var _webClient = new WebClientExtension())
            {
                var _serverResponse1 = _webClient.DownloadString("https://localhost:9443/jazz/authenticated/identity");
                //set username and password
                var data = new NameValueCollection
            {
                { "j_username", "UserName" },
                { "j_password", "Password" },
            };
                //authenticate
                var _serverResponse2 = _webClient.UploadValues("https://localhost:9443/jazz/authenticated/j_security_check", data);
                Console.WriteLine(Encoding.Default.GetString(_serverResponse2));
            }
        }
    }

WebClientExtension class inherits WebClient class.  In this class we have created a cookie container and overridden GetWebRequest function. In order to authenticate we first create an object of this class, set the username and password in name/value collection and upload it to the server for the authentication. Server response is then printed using Console.WriteLine.

2. HTPWebRequest/HttpWebResponse class:
In the example below, I have used WebRequestExtenstions class for cloning HTTPWebrequest object. You don’t have to use WebRequestExtenstions class in your implementation. I have used this class as I was doing another POC related to cloning a HTTPWebrequest object.

 public static HttpWebResponse requestSecureDocument(HttpWebRequest _request, string _rtcServerURL, string _userName, string _password)
        {
             //FormBasedAuth Step1: Request the resource and clone the request to be used later
            HttpWebRequest _requestClone = WebRequestExtensions.CloneRequest(_request, _request.RequestUri);//(HttpWebRequest)WebRequest.Create(request.RequestUri);

            //store the response in _docResponse variable
            HttpWebResponse _docResponse = (HttpWebResponse)_request.GetResponse();

            //HttpStatusCode.OK indicates that the request succeeded and that the requested information is in the response.
            if (_docResponse.StatusCode == HttpStatusCode.OK)
            {
                //X-com-ibm-team-repository-web-auth-msg header signifies form based authentication is being used
                string _rtcAuthHeader = _docResponse.Headers["X-com-ibm-team-repository-web-auth-msg"];
                if ((_rtcAuthHeader != null) && _rtcAuthHeader.Equals("authrequired"))
                {
                    _docResponse.GetResponseStream().Flush();
                    _docResponse.Close();

                    //Prepare form for authentication as _rtcAuthHeader = authrequired
                    HttpWebRequest _formPost = (HttpWebRequest)WebRequest.Create(_rtcServerURL + "/j_security_check");
                    _formPost.Method = "POST";
                    _formPost.Timeout = 30000;
                    _formPost.CookieContainer = _request.CookieContainer;
                    _formPost.Accept = "text/xml";
                    _formPost.ContentType = "application/x-www-form-urlencoded";

                    String _authString = "j_username=" + _userName + "&j_password=" + _password; //create authentication string
                    Byte[] _outBuffer = Encoding.UTF8.GetBytes(_authString); //store in byte buffer
                    _formPost.ContentLength = _outBuffer.Length;
                    Stream _str = _formPost.GetRequestStream();
                    _str.Write(_outBuffer, 0, _outBuffer.Length); //update form
                    _str.Close();

                    //FormBasedAuth Step2:submit the login form and get the response from the server
                    HttpWebResponse _formResponse = (HttpWebResponse)_formPost.GetResponse();

                    _rtcAuthHeader = _formResponse.Headers["X-com-ibm-team-repository-web-auth-msg"];
                    //check if authentication has failed
                    if ((_rtcAuthHeader != null) && _rtcAuthHeader.Equals("authfailed"))
                    {
                         //authentication failed. You can write code to handle the authentication failure.
                        //if (DEBUG) Console.WriteLine("Authentication Failure");
                    }
                    else
                    {
                        //login successful
                        _formResponse.GetResponseStream().Flush();
                        _formResponse.Close();
                        //FormBasedAuth Step3: Resend the request for the protected resource.
                        //if (DEBUG) Console.WriteLine(">> Response " + request.RequestUri);
                        return (HttpWebResponse)_requestClone.GetResponse();
                    }
                }
            }
            //already authenticated return original response_docResponse
            return _docResponse;
        }

The code is mostly self explanatory. This function accepts four parameters –HttpWebRequest object for the resource being requested from the RTC Server, Server URL, username and password. Here is sample code to call this function:

            string _serverURL = https://localhost:9443/ccm; 
            string _resourceURL = "https://localhost:9443/ccm/rootservices";

            string mediatype = "application/xml";
            string username = "username";                                    
            string password = "password";
            try
            {
                CookieContainer _cookies = new CookieContainer();//create cookie container
                HttpWebRequest documentGet = (HttpWebRequest)WebRequest.Create(_resourceURL);
                documentGet.Method = "GET"; //method
                documentGet.CookieContainer = _cookies; //set container for HttpWebRequest 
                documentGet.Accept = mediatype;
                documentGet.Headers.Set("OSLC-Core-Version", "3.0"); //for RTC 3.0.1.2
                documentGet.Timeout = 300000;
                HttpWebResponse response = requestSecureDocument(documentGet, _serverURL, username, password);

                if (response.StatusCode != HttpStatusCode.OK)
                {
                    Console.WriteLine(" Error: " + response.StatusDescription);
                    response.Close();
                }
            }
            catch (Exception ex)
            {
            }

This brings us to the end of the first article. Hope you’ll find this article helpful. In next article we will be looking at querying workitems through C# using OSLC.

Posted in Uncategorized | Tagged , , , , , , , | 12 Comments

Whitepaper on Installation and configuration if IBM RTC 3.0.1.2 on Windows Server 2008 R2 x64 and SQL Server 2008 R2

This whitepaper provides high level steps for installation and configuration of IBM Rational Team Concert (RTC) 3.0.1.2 on 64-bit Windows Server 2008 R2 with 32-bit SQL Server 2008 R2.

Posted in Uncategorized | Tagged , , , , , , | Leave a comment

Installation and configuration of IBM RTC 3.0.1.2 on Windows Server 2008 R2 x64 and SQL Server 2008 R2 x86

Configuring RTC on Windows machine with Microsoft SQL Server has its own set of challenges. This is a high level blog about installation and configuration of IBM Rational Team Concert (RTC) on Windows Server 2008 R2 and use Microsoft SQL Server 2008 R2 as the backend.

We’ll cover following topics in this blog:

1. Installation of RTC Server

2. SQL Server Configuration

3. Configuring the application

My environment:

Windows Version: Windows Server 2008 R2 [64 bit]
SQL Server: Microsoft SQL Server 2008 R2 [32 bit]

Before proceeding further with the installation, please make sure that your system meets the system requirements mentioned here – https://jazz.net/library/article/632

1. Installation of RTC Server

First thing first, you’ll need an account on http://jazz.net. Register yourself and create a new account if you already do not have one! You’ll need this account for almost everything related to RTC. Logon to http://jazz.net and go to RTC download page: https://jazz.net/downloads/rational-team-concert/. Download the correct version based on your platform. In this post I’ve written about installation and configuration of Rational Team Concert 3.0.1.2 (https://jazz.net/downloads/rational-team-concert/releases/3.0.1.2) on 64 bit Windows operating environment.

First few steps are pretty straight forward. Extract the contents of the zip file – RTC-Web-Installer-Win-3.0.1.2.zip to a folder and run Launchpad.exe. This will launch the RTC installer as shown in the screenshot below:
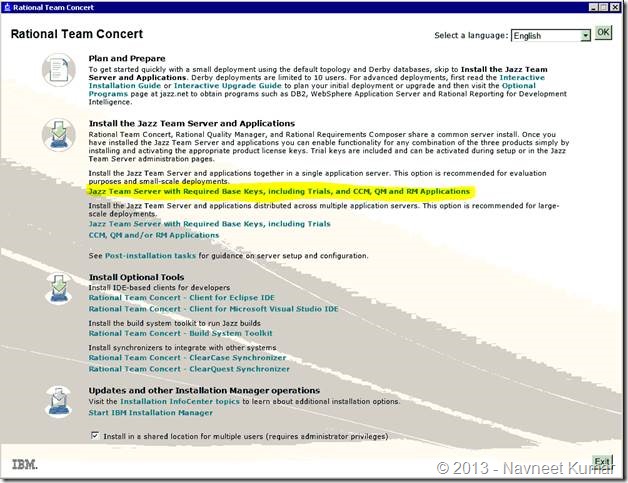
clip_image002

Click on “Jazz Team Server with Required Keys, including Trials, and CCM, QM and RM applications”. This will launch the IBM Installation Manager and you’ll be authenticated (using the username and password which you used for logging into http://jazz.net).

Select all the packages which you would like to install on the server. I selected all the packages:
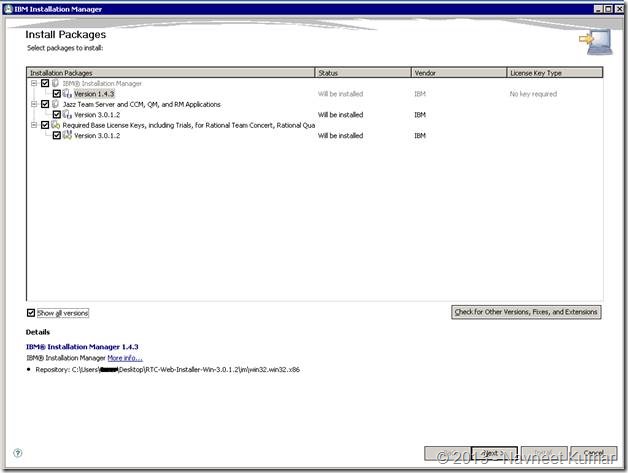
clip_image004

Click on Next> button once you have selected the packages. This will take you the License Agreement Page. Next button will get enabled if you click on the checkbox – I accept the terms in the license agreements.
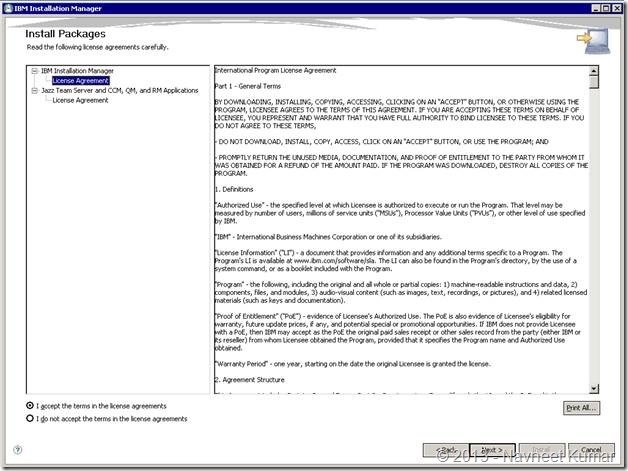
clip_image006

Click Next on the license agreement page. This will you to the next page where you need to specify the Installation manager directory and shared resources directory as shown in the screenshot below:
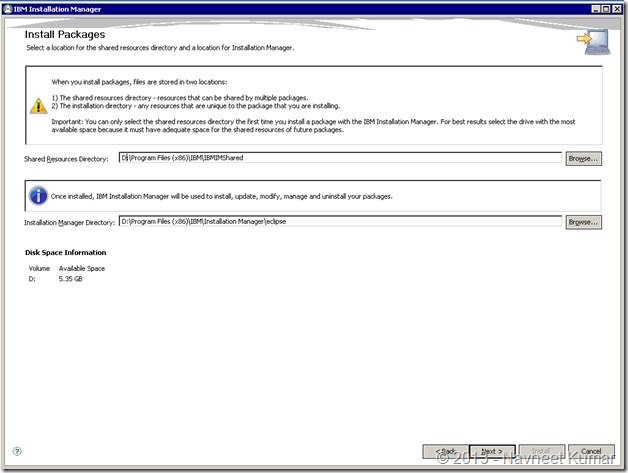
clip_image008

Clicking next will bring you the package selection page. Here you can create a new package group if you are installing RTC for the first time on the server. You’ll also have to specify the installation directory for the new package group:
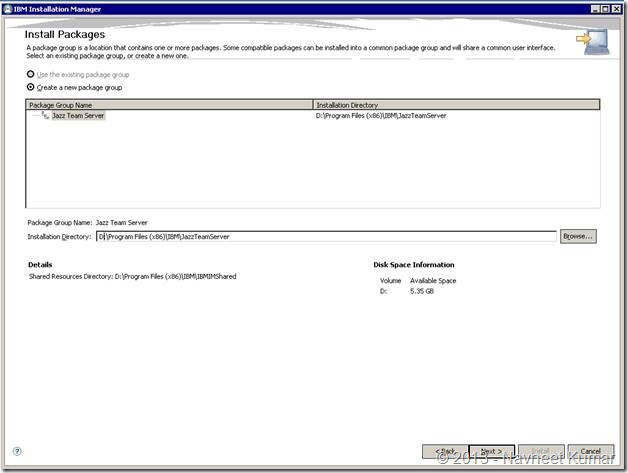
clip_image010

You can select the translations on the next page. I didn’t select any language on this page. English was selected by default.
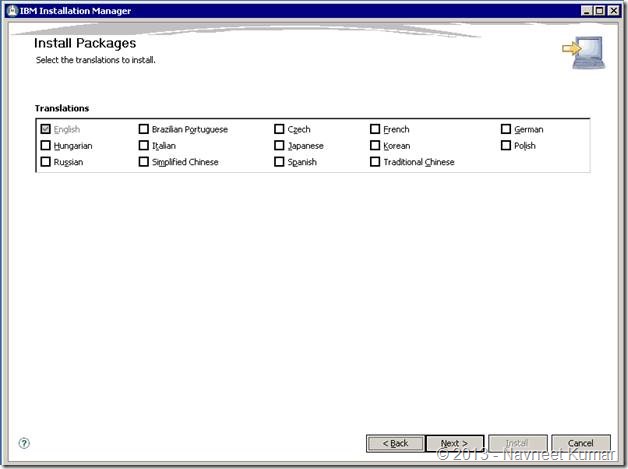
clip_image012

Select all the features that you would like to install on the next page. I have selected all the features.
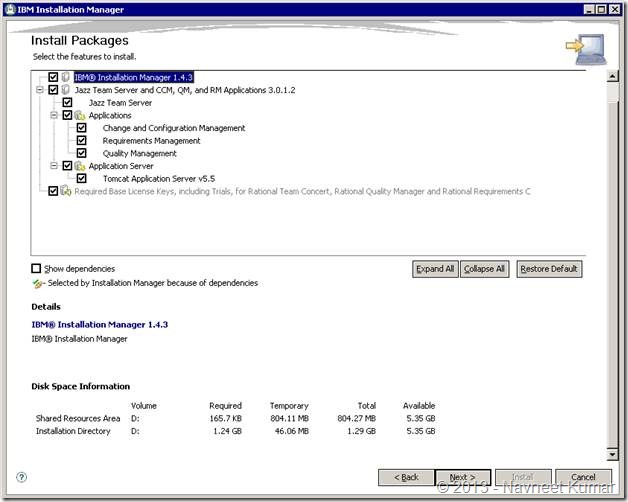
clip_image014

On next page you’ll have to select the context roots of all the installed applications. These applications are Jaaz Team Server, Change and configuration management (CCM), Quality Management (QM) and resource management (RM). I decided to go with the default 3.x application context roots.
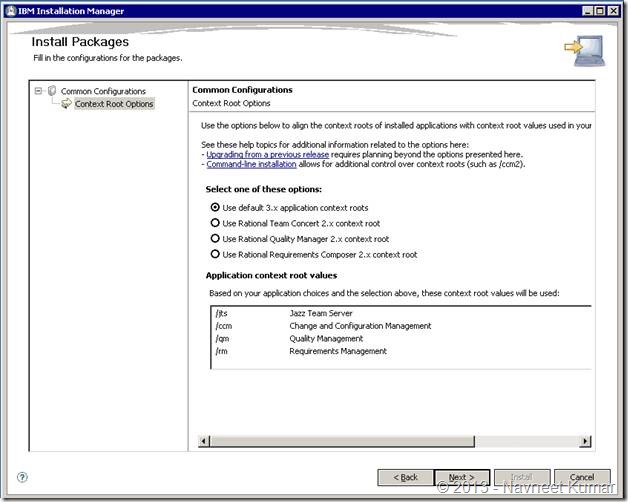
clip_image016

On next page you can review the installation summary and press the install button. Installation starts as soon as you press the install button
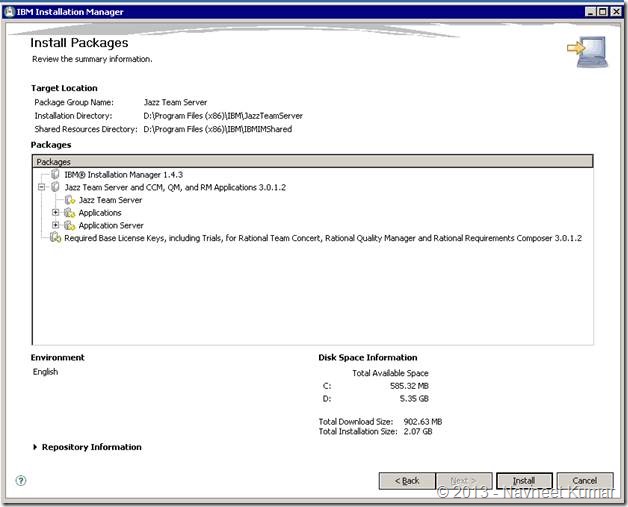
clip_image018

This will download the latest files from the server and deploy it on your machine. Please make sure that you have an active Internet connection available.
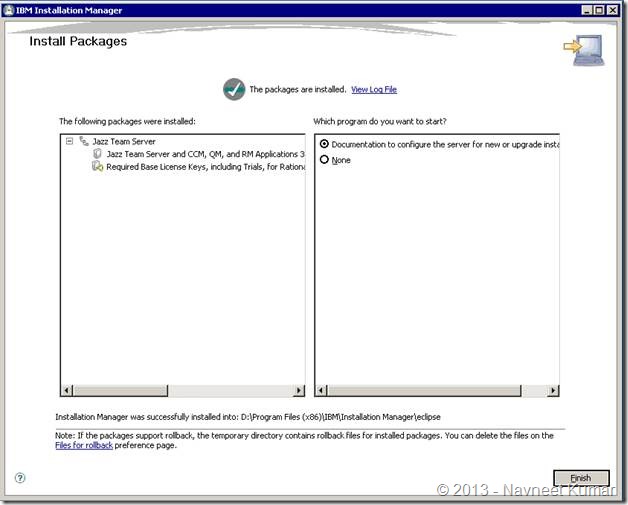
clip_image020

Press the finish button once the installation is over. This will bring up an article in RTC documentation to configure the server. You can read the documentation online at following location – http://pic.dhe.ibm.com/infocenter/clmhelp/v3r0m1/index.jsp?topic=/com.ibm.jazz.install.doc/topics/c_post_install.html

2. SQL Server configuration

The next is configuration of the database server. I have used 32-bit Microsoft SQL Server 2008 R2 as database server. There were some challenges related to JDBC driver configuration which I ran into. Thankfully I was able to resolve it. Here are the steps:

First you’ll have to download and install the JDBC Driver. JDBC Driver 2.0 can be downloaded from Microsoft website at following location – http://www.microsoft.com/downloads/details.aspx?FamilyID=99b21b65-e98f-4a61-b811-19912601fdc9&displaylang=en

Please refer to following page for detailed information on SQL Server configuration – http://pic.dhe.ibm.com/infocenter/clmhelp/v3r0m1/index.jsp?topic=%2Fcom.ibm.jazz.install.doc%2Ftopics%2Ft_s_server_installation_setup_sql.html

Other than the steps mentioned in the documentation above, here are few other things which came handy:

1. Use following command to get version on JVM – %installdir%\IBM\JazzTeamServer\server\jre\bin>JAVA –version

2. Also make sure that users have full access on %installdir%\IBM folder

3. Another simple way is to create a new folder “sqlserver” under the installation directory and place the driver in that directory. Please refer to comments from Walter Mansur given on Aug 03 ’11, 9:09 a.m at following location – https://jazz.net/forum/questions/60079/cannot-create-jazz-database-tables-sql-server

4. User following command to verify SQL Server configuration – %installdir%\IBM\JazzTeamServer\server>repotools-jts.bat –verify

Optionally, you can also configure the port number of the SQL Server. In our case, we were using 32 bit SQL server with named instance, so we had to configure the TCP IP port for the instance
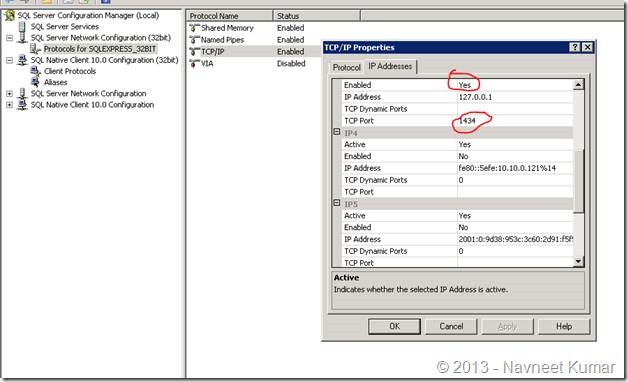
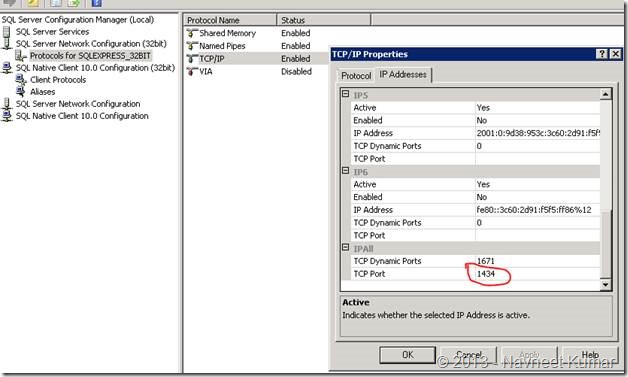
clip_image022

clip_image024

3. Configuring the application

1. Apache server configuration

If you would like to change the default ports for SSL and non-SSL you’ll have to configure the server.xml located at following path:%installdir%\IBM\JazzTeamServer\server\tomcat\conf\server.xml

Default port for SSL is 9443 and for non-SSL is 9080. I changed it to 443 for SSL and 8080 for non-SSL. Here are the relevant sections from server.xml:

<!– Define a non-SSL HTTP/1.1 Connector on port 9080 –>

<Connector port=”8080” maxHttpHeaderSize=”8192″

maxThreads=”150″ minSpareThreads=”25″ maxSpareThreads=”75″

enableLookups=”false” redirectPort=”443″ acceptCount=”100″

connectionTimeout=”20000″ disableUploadTimeout=”true”

URIEncoding=”UTF-8″ />

<!– Define a SSL HTTP/1.1 Connector on port 9443 –>

<Connector port=”443

connectionTimeout=”20000″

maxHttpHeaderSize=”8192″

maxThreads=”150″

minSpareThreads=”25″

maxSpareThreads=”75″

enableLookups=”false”

disableUploadTimeout=”true”

acceptCount=”100″

scheme=”https”

secure=”true”

clientAuth=”false”

keystoreFile=”ibm-team-ssl.keystore”

keystorePass=”ibm-team”

sslProtocol=”${jazz.connector.sslProtocol}”

algorithm=”${jazz.connector.algorithm}”

URIEncoding=”UTF-8″ />

You can read more about this here – http://pic.dhe.ibm.com/infocenter/clmhelp/v3r0m1/topic/com.ibm.jazz.install.doc/topics/t_ports_change.html

2. Starting up RTC server and administrative login:

Use following command: IBM\JazzTeamServer\server> .\server.startup.bat

Login to https://localhost/jts/setup

Username: ADMIN

Password: ADMIN

You can now configure the public URI of the RTC Server. This is particularly important if you are planning to have RTC server is accessible over the Internet. I had to make sure that both 8080 and 443 port are open on the firewall so that users can access RTC over the Internet.
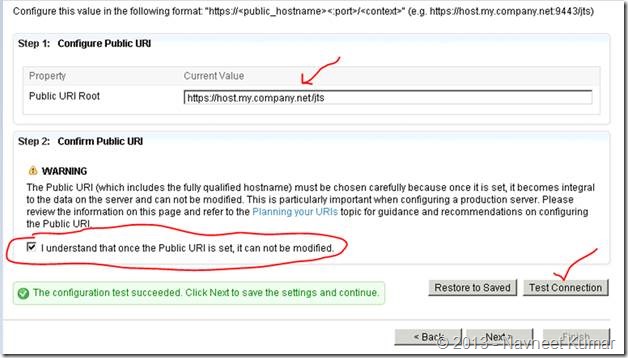
clip_image026

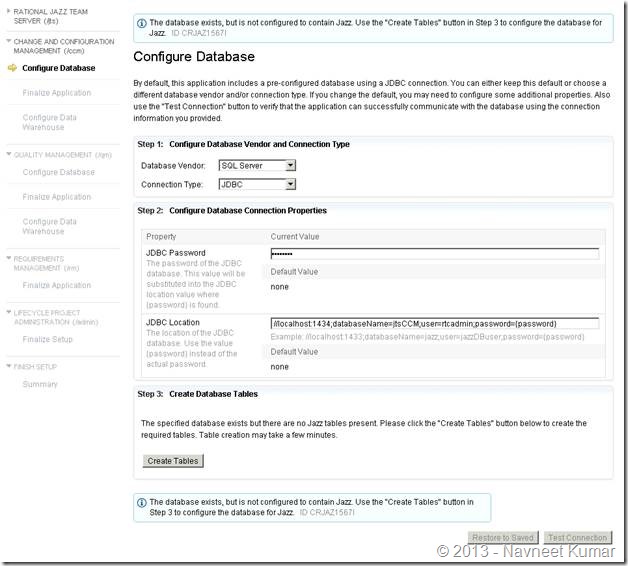
3. Configuring databases, email and other misc. configuration

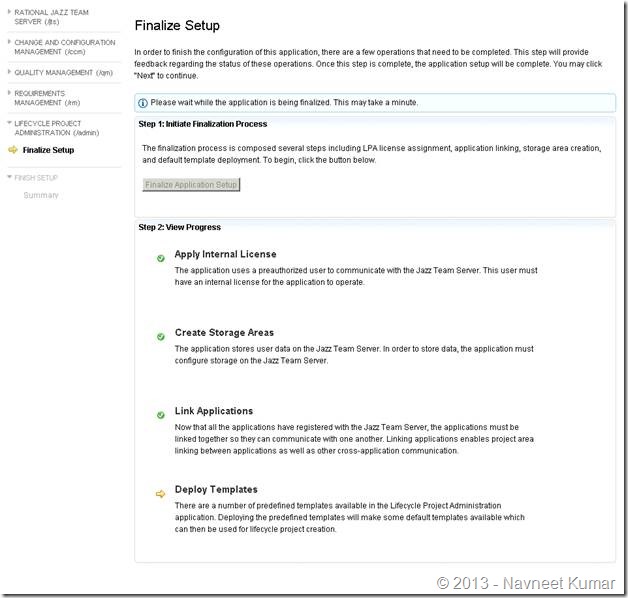
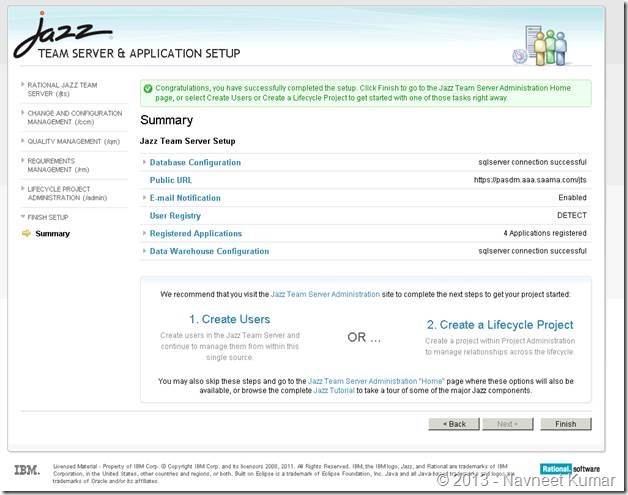
I have put together the screenshots of remaining configurations. Screenshots are mostly self-explanatory.

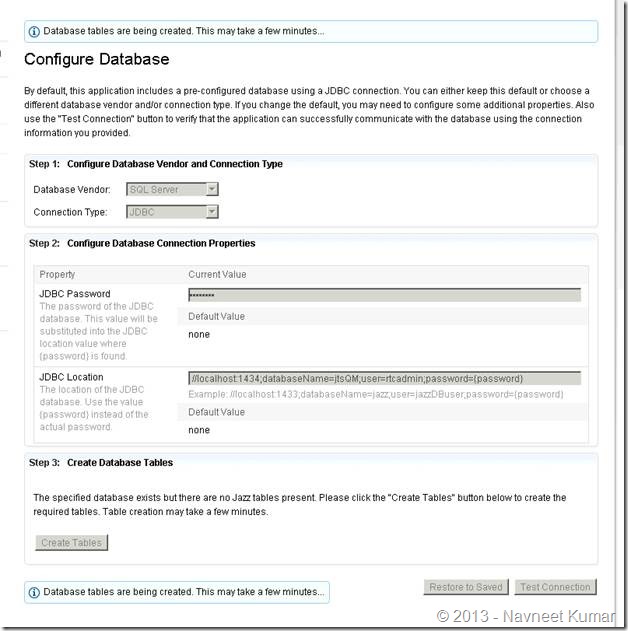
This screenshot shows the database configuration page for Jazz Team Server. Take a note of JDBC Connection string used here with the custom port – 1434.
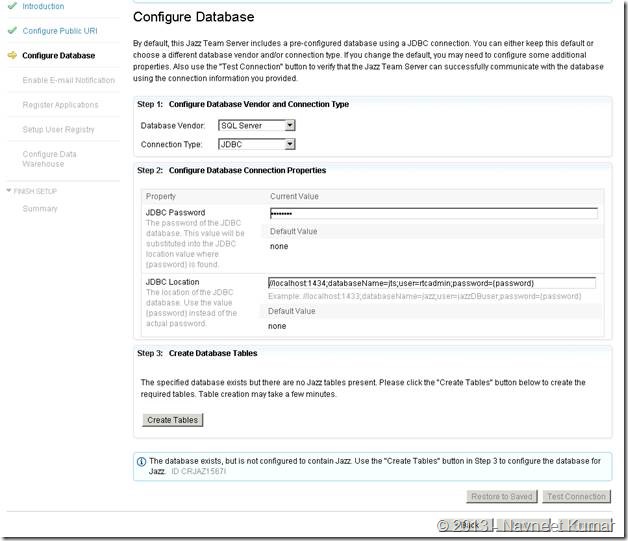
clip_image028

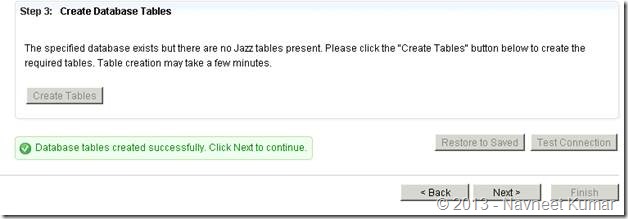
Create tables by clicking button

clip_image030

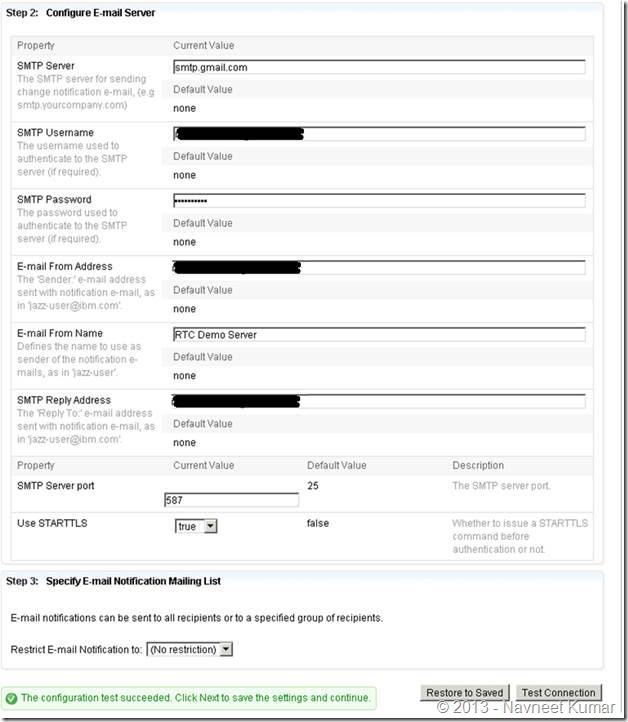
Email configuration:

I have configured my Gmail as my email server. Read more about email configuration here:

https://jazz.net/forum/questions/26597/gmail-smtp-configuration?redirect=%2Fforum%2Fquestions%2F26597%2Fgmail-smtp-configuration
clip_image032

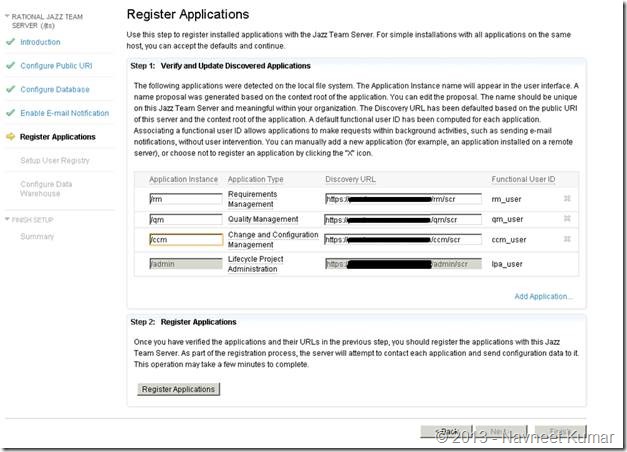
Application registration:

clip_image034

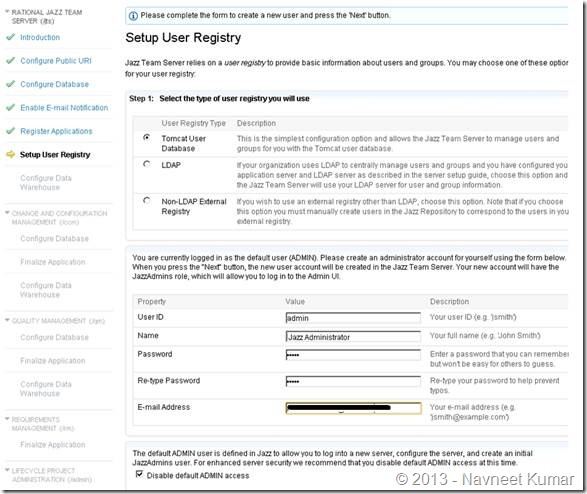
Setup user registry:

clip_image036

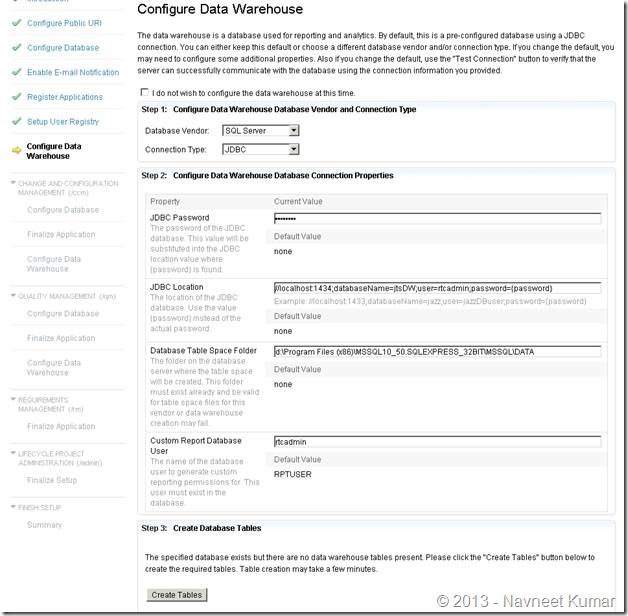
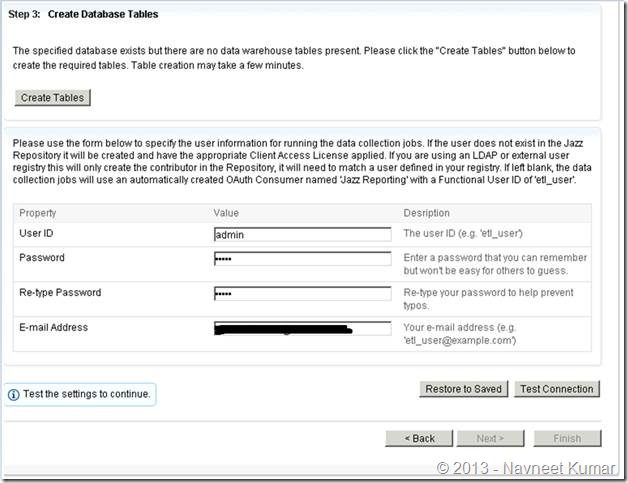
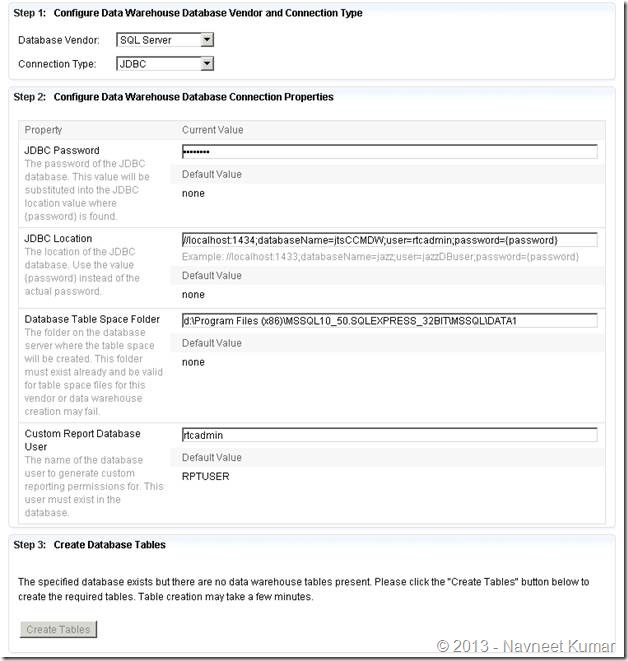
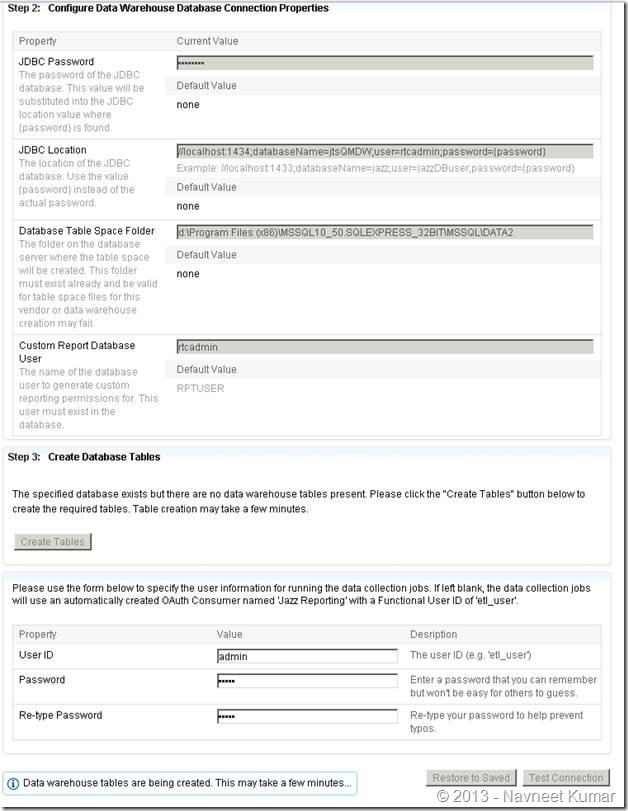
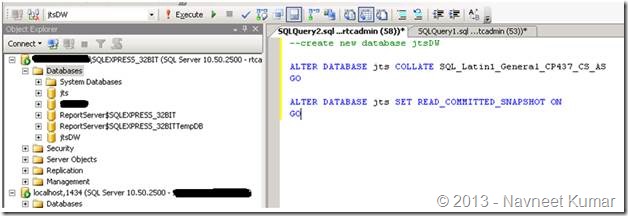
Configuring data warehouse

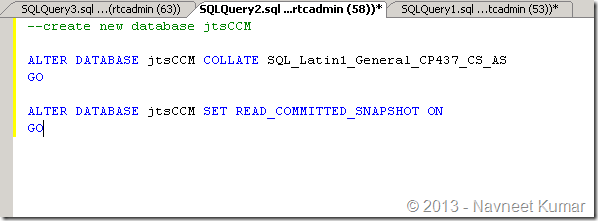
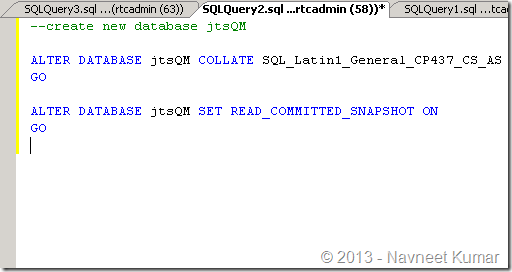
1. Create db with collation
clip_image038

clip_image040

clip_image042

CCM configuration

clip_image043

clip_image045

clip_image047

clip_image049

QM

clip_image050

clip_image052

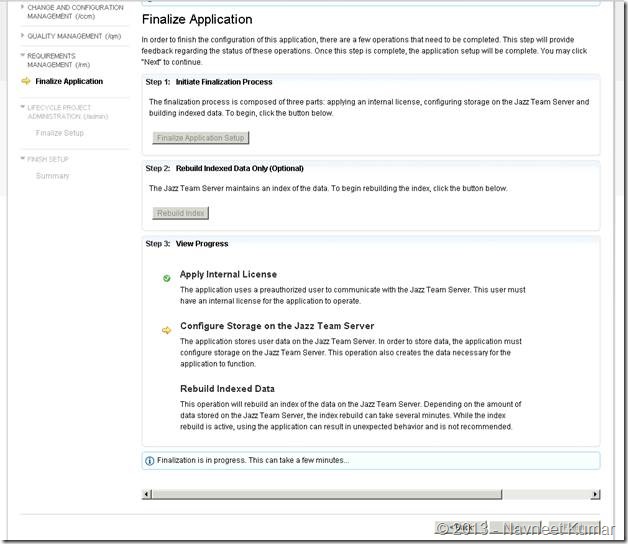
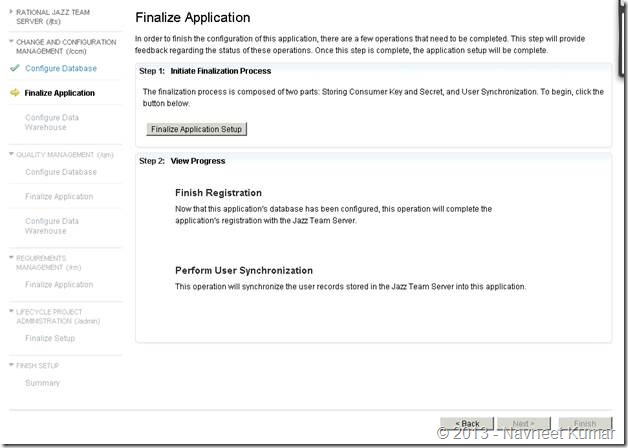
FINALIZE
clip_image054

clip_image056

clip_image058

clip_image060

Posted in Uncategorized | Tagged , , , | Leave a comment